Document Page
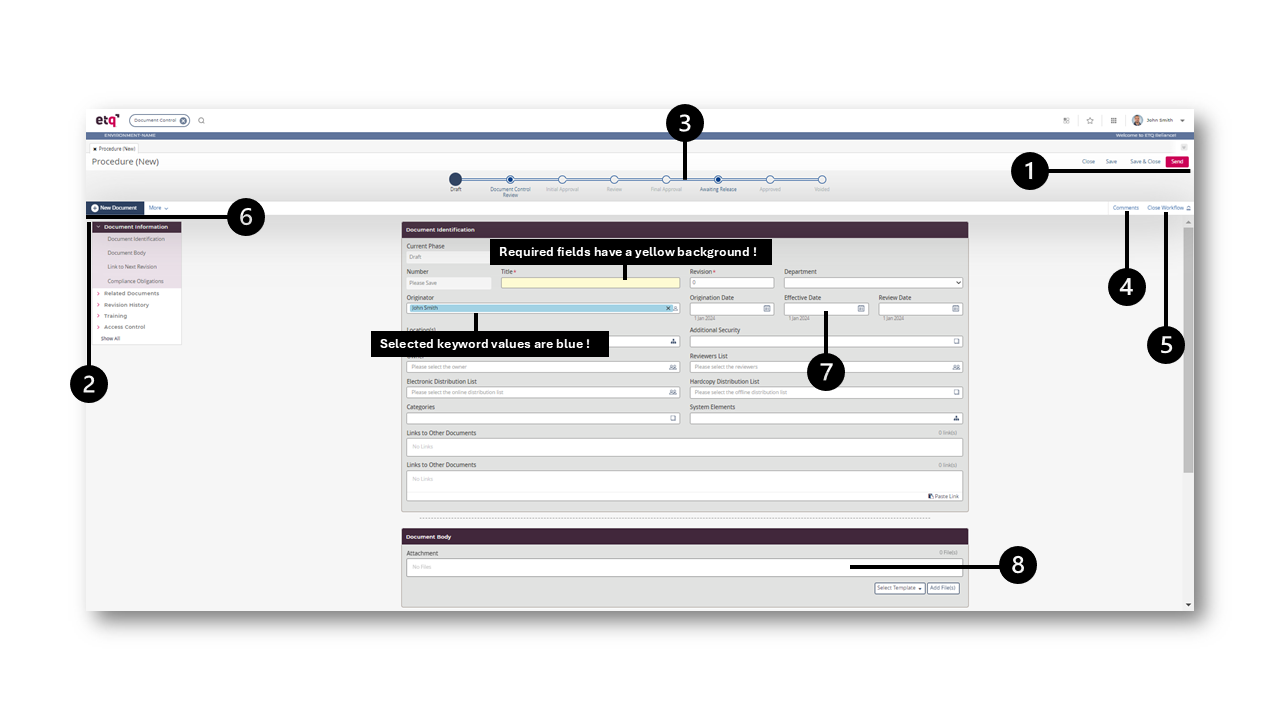
All documents in Reliance have the same look and feel. We're going to use a Document Control document as an example to explain the document layout.
Each document has the following components.
-
Primary ActionsPrimary Actions
The document's Primary actions are the actions that you would use once you finish working on the document like save & close or send.
If the document allows more than one routing option, such as sending Back or Reassigning, the actions will be wrapped under the Send menu, which opens when you click on the small arrow to the right.
-
Document NavigatorDocument Navigator
Navigates you through the document's tabs and sections. Click Show All to show all of the document's tabs.
-
The document workflow is different based on the document type selected. Some documents have no workflow as they are non-workflow documents, typically profiles. The workflow has phases and allows you to send the document between them.
The phases are displayed differently according to their status:
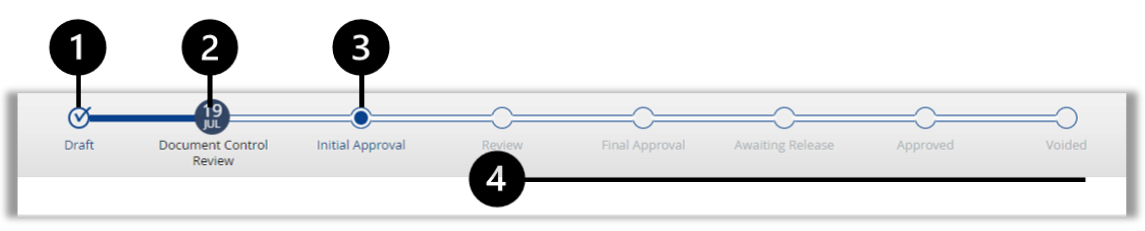
1. Done phase.
2. Current phase.
The current phase appears in different colors based on the due date. Assume that today is Oct. 19, and the current phase will be:
 Oct.18 Due date is passed.
 Oct. 21 Due date is not reached.
 Oct.19 Due date is today.
3. Available next phase
4. Remaining phases in the process
-
Once you open the document, the most recently entered comment will pop up. Click on the arrows to open the comments pane and post a comment, or show all comments in a different dialog so you can better find a specific comment when the list grows long.
-
You can Close the Workflow for more document space.
-
Document ToolbarDocument Toolbar
The Document Toolbar may include different actions based on your access and document configurations. Use the New Document action to create another document from the current one and explore other actions through the More menu.
-
Click in the date field and enter the date using the provided format under it, then press enter or click outside the field. Or click on the calendar icon and find the date you want, then press enter or space-bar or click outside the field to fill in the field with the selected date. This also applies to the Date and Time fields.
Entering a date is only valid when your language is set to English. It may be disabled by your administrator.
-
Attachment FieldAttachment Field
Use the attachment field to include different attachment types in the document. The attachment field actions are:
Add File(s): Open native files browsers, so you can browse for and select the file to attach. An attachment will have three dots menu with actions to Rename, Copy URL, Delete or Download the attachment. Click on an attachment to download it except for the PDF attachment. Click on a PDF attachment to preview it before downloading it.
Select Template: Lists all Office Integration templates configured for this field so you can create the attachment based on the selected template.
Create New +: Creates a new collaboration Microsoft 365 File or Google Document based on the collaboration platform used by your organization. Notice that this option will not be available if it isn't configured by your administrator.
Download All: Download all files attached (excluding Google Documents).
 When you open an attachment, it gets saved with an encoded name in the Windows temporary folder.
 -
To mark documents as favorites:
-
Open the application of the intended document.
-
Find the intended document and open it.
-
Click on the
.png) icon within the document toolbar.
icon within the document toolbar.
The marked document will be accessible through the Favorites menu > Documents category. The documents will be classified into sub-menus according to their parent applications under the Favorites
menu > Documents category. Each application sub-menu will show a number indicating how many favorite documents it has.To unfavorite a document, you can either click again on the
 action on the favorited document or click on the remove action next to the document on the Favorites menu.
-
|
|
|